
Why Recycled Plastic Seating Transforms Your Outdoor Fireplace Into a Year-Round Haven
Picture this: You’re gathered around a crackling outdoor fire on a cool evening, settled into comfortable seating that’s not only stylish and weather-resistant but also made entirely from recycled ocean-bound plastics. It sounds too good to be true, but welcome to the revolution in sustainable outdoor living spaces where environmental responsibility meets exceptional design. For proper safety guidelines and expert advice on creating these spaces, visit masonchimneyrepair.com to learn more about best practices.
The marriage of recycled plastic furniture and fire features might raise eyebrows at first. After all, plastic near flames? Here’s the reality: High-quality recycled plastic outdoor furniture maintains safe distances from fire features just like any traditional seating material would. These premium seating pieces crafted from HDPE (high-density polyethylene) perform beautifully for decades while resisting fading, cracking, and extreme temperatures. These aren’t flimsy lawn chairs, and they divert thousands of plastic bottles from landfills.
The transformation happening in backyards across the country tells a compelling story. Homeowners are discovering they don’t have to choose between their environmental values and creating stunning outdoor retreats. Recycled plastic seating offers the warmth and character of natural materials without the maintenance headaches, the deforestation concerns, or the constant refinishing. It’s furniture with a purpose, a conversation starter, and a testament to innovation – proving that sustainability can be both practical and absolutely gorgeous.
The Perfect Marriage: Fire Features and Sustainable Seating
What Makes Fireplace Seating Different
Gathering around a fire creates magical moments, but it also creates unique challenges for your outdoor furniture. The heat radiating from flames, the occasional wayward ember, and smoke drifting on an evening breeze all demand seating that can truly handle the elements.
Unlike regular patio furniture that sits comfortably away from heat sources, fireplace seating faces direct thermal exposure. Traditional materials like fabric cushions can absorb smoke odors, while untreated wood may dry out and crack from repeated heat cycles. Metal furniture becomes uncomfortably hot to touch, and wicker can pose a fire hazard when embers escape.
Temperature fluctuations add another layer of complexity. Your fireplace seating experiences extreme contrasts – from the intense warmth of a crackling fire to freezing winter nights when the flames die down. Then there’s the seasonal challenge of storing or maintaining furniture that’s been repeatedly heated and cooled.
This is where recycled plastic seating proves its worth. The material naturally resists heat damage at safe seating distances from fire features, won’t absorb smoke smells, and handles temperature swings without warping or becoming brittle. Plus, an occasional ember landing on the surface won’t leave permanent damage like it would on fabric or natural materials. You get peace of mind knowing your sustainable choice is also the practical one.
How Recycled Plastic Rises to the Challenge
You might wonder how plastic and fire can coexist safely, and that’s exactly the smart thinking that led to today’s innovative recycled plastic seating. Here’s the exciting part: modern recycled plastic furniture designed for outdoor spaces isn’t your everyday plastic. These materials undergo specialized manufacturing processes that give them impressive heat resistance, making them perfectly suited for placement around fireplace areas.
The recycled plastic used in quality outdoor seating maintains its structural integrity in temperatures that would make traditional plastics sweat. While it’s not fireproof, high-grade recycled plastic resists warping and melting at the ambient temperatures found around outdoor fireplaces when positioned at recommended safe distances. Think of it as having a comfort zone that aligns perfectly with your own seating preferences near the warmth.
What really sets recycled plastic apart is its remarkable stability. Unlike wood that can dry out and crack from heat exposure, or metal that becomes uncomfortably hot to touch, recycled plastic maintains consistent performance. It won’t splinter, rust, or deteriorate from the temperature fluctuations that fireplace areas experience.
The material’s density and composition create natural resistance to the challenges outdoor fire features present, giving you peace of mind while you enjoy those memorable evenings gathered around the flames.
From Waste to Warmth: The Journey of Recycled Plastic Seating
The Upcycling Process Explained
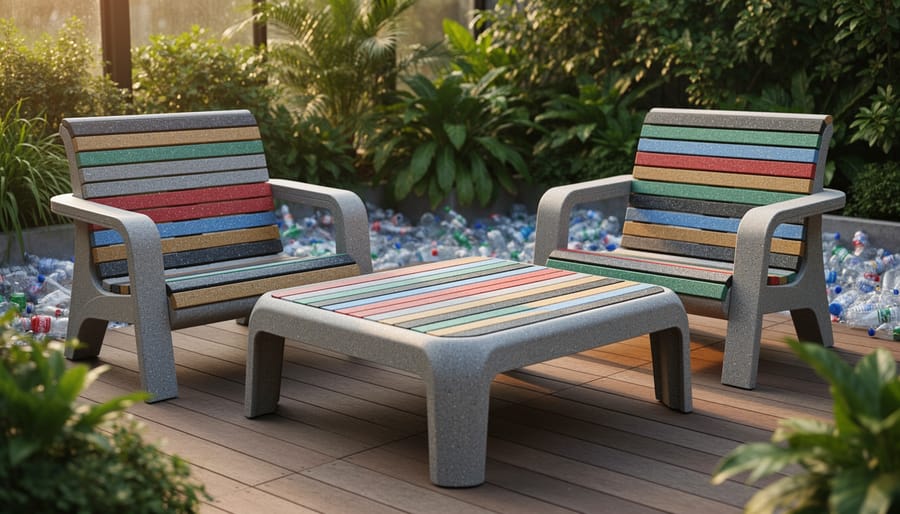
The journey from discarded plastic bottle to beautiful outdoor seating is honestly pretty amazing. It starts with collection, where post-consumer plastics like HDPE (high-density polyethylene, the sturdy stuff in milk jugs) and PETE (polyethylene terephthalate, found in soda bottles) arrive at recycling facilities. These materials are sorted by type because different plastics have different melting points and properties, kind of like how you wouldn’t bake cookies and roast vegetables at the same temperature.
Once sorted, the plastics go through an intensive cleaning process to remove labels, adhesives, and any contaminants. This step is crucial because any impurities can weaken the final product. Think of it like preparing ingredients for a family recipe – you want everything clean and ready before you start.
Next comes the transformation. The clean plastics are shredded into small flakes, then melted and blended together. Many manufacturers add UV stabilizers at this stage, which protect the material from sun damage and prevent fading. This blended mixture is then extruded into pellets or directly molded into furniture components.
What makes this process particularly exciting for outdoor fireplace seating is that manufacturers can engineer the blend for heat resistance. By adjusting the polymer ratios and adding specific additives, they create material that withstands temperature fluctuations without warping or releasing harmful chemicals. The result is furniture that looks beautiful, performs reliably, and keeps approximately 400 plastic bottles per chair out of landfills.
Our Family’s Mission: From Small Venture to Global Impact
Our story began fifteen years ago in a small workshop, where our grandfather saw plastic waste not as garbage, but as opportunity. What started as a weekend project—transforming discarded bottles into garden furniture—has blossomed into a mission that touches communities across three continents. We’re still a family operation at heart, now led by the third generation who grew up sorting recyclables at the kitchen table.
Every piece of seating we create represents our commitment to proving that sustainability doesn’t mean compromise. We’ve diverted over 2 million pounds of plastic from landfills and oceans, transforming what would have polluted our planet for centuries into beautiful, functional outdoor furniture. Our grandmother always said, “Waste is just creativity waiting to happen,” and that philosophy guides everything we do.
Today, families gather around outdoor fireplaces on seating that tells a story of redemption—where yesterday’s water bottles become tomorrow’s cherished gathering spaces. We measure success not just in sales, but in the tons of plastic kept from our oceans and the conversations sparked around sustainable living. This isn’t just business for us; it’s our family’s legacy of environmental stewardship.
Design Styles That Complement Your Outdoor Fireplace
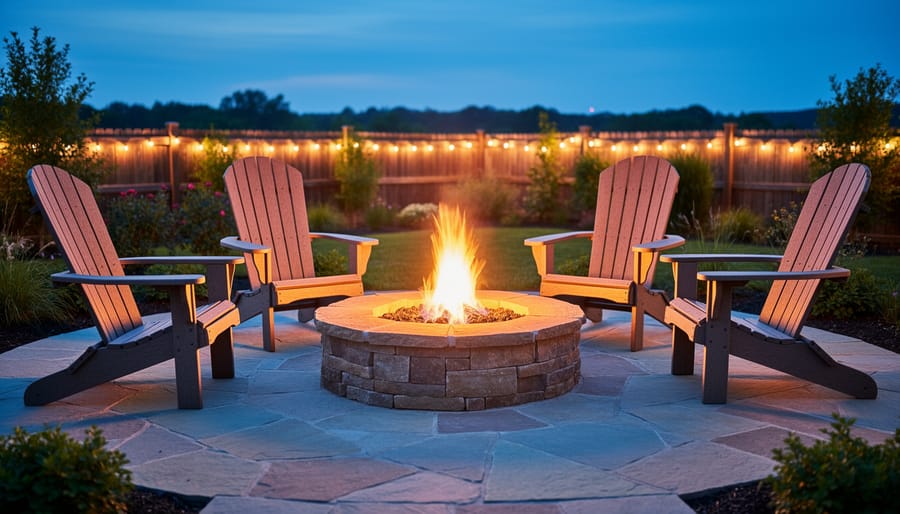
Adirondack Chairs for Classic Chimney Designs
There’s something timeless about settling into an Adirondack chair beside a crackling fire, and now you can embrace that tradition with a clear conscience. Classic Adirondack-style stylish recycled plastic chairs beautifully complement rustic stone chimneys and traditional brick outdoor fireplaces while keeping plastic waste out of landfills and oceans. Each chair diverts roughly 500 milk jugs from the waste stream, transforming yesterday’s containers into tomorrow’s cherished gathering spots.
The wide armrests are perfect for resting your hot cocoa or s’mores ingredients, while the contoured seat encourages long conversations under the stars. These chairs maintain the beloved slanted back and broad slats of the original design, but unlike their wooden predecessors, they won’t splinter, crack, or require annual staining. The natural texture options in earth tones blend seamlessly with stone and brick, creating that cozy cabin aesthetic homeowners adore. Position them around your chimney fireplace to create an inviting circle where family traditions flourish season after season.
Modern Bench Seating for Contemporary Fire Features
Contemporary fire features deserve equally sophisticated seating, and recycled plastic delivers that modern aesthetic beautifully. Today’s minimalist bench designs feature clean lines, low profiles, and seamless construction that perfectly complement sleek fireplaces and geometric fire pits. Picture streamlined benches in sophisticated charcoal or warm taupe, creating stunning visual continuity with your outdoor architecture.
What makes these recycled plastic decors particularly exciting is how they enhance rather than compete with your fire feature’s design. Backless benches maintain sightlines across your space, while floating styles with hidden mounting systems create that coveted contemporary look. The material’s ability to achieve crisp edges and smooth surfaces rivals concrete or metal, yet it’s far more comfortable and environmentally responsible.
These benches work wonderfully in modern courtyards and rooftop spaces where every element contributes to a cohesive design story. You’re choosing furniture that looks incredible while transforming ocean-bound plastic into functional art.
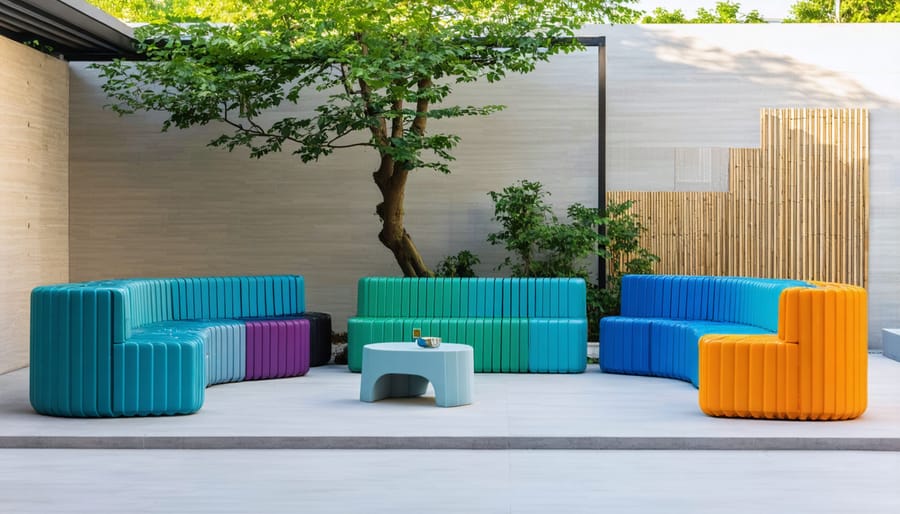
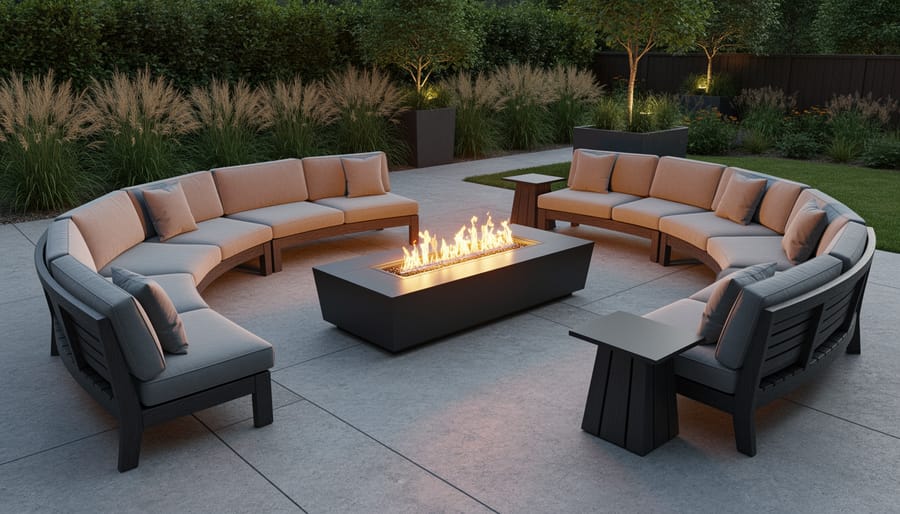
Curved Sectionals for Conversation Around the Fire
There’s something magical about gathering in a circle around dancing flames, and curved sectionals made from recycled plastic make these moments even more special. Unlike traditional straight benches that create barriers, curved seating naturally brings everyone together, fostering the kind of face-to-face connection that makes firepit gatherings unforgettable.
Recycled plastic sectionals offer incredible flexibility for circular fire features. You can arrange individual curved pieces to create a complete circle for larger gatherings or configure a cozy semi-circle for intimate evenings with close friends and family. The modular design means you’re never locked into one arrangement, adapting as your entertaining needs change through the seasons.
What makes this choice particularly rewarding is knowing that every curve of your seating represents plastic bottles, containers, and packaging diverted from landfills and oceans. These pieces maintain their shape and vibrant color year after year, resisting the warping and fading that plagues traditional materials exposed to fire’s radiant heat. The low-maintenance nature means more time enjoying conversations and less time refinishing or replacing furniture, creating lasting memories while honoring your commitment to sustainable living.
The Environmental Impact You’re Making
Plastic Diverted from Landfills and Oceans
Here’s the real-world impact that makes us proud: every single piece of recycled plastic seating typically diverts between 200 to 400 plastic bottles from ending up in landfills or, worse yet, our oceans. That’s hundreds of bottles per chair that get a second life instead of taking centuries to decompose in nature.
When you think about it, choosing just four chairs for your fireplace seating area means you’ve helped repurpose up to 1,600 plastic bottles. Now multiply that by the thousands of families making similar choices, and you’re looking at millions of bottles transformed into beautiful, functional furniture. It’s the kind of ripple effect that genuinely changes things.
What really excites us is watching this impact grow. Since we started focusing on recycled plastic furniture as a family business, we’ve seen the cumulative numbers climb into the tens of millions of bottles diverted. Each customer becomes part of this larger story of environmental restoration. You’re not just buying a bench or chair, you’re casting a vote for cleaner oceans and less overwhelmed landfills. That decision matters, and it creates momentum that inspires manufacturers to keep innovating with sustainable materials.
The Ripple Effect: Supporting Global Recycling Networks
Every time you choose recycled plastic seating for your outdoor fireplace area, you’re doing something bigger than upgrading your patio. You’re casting a vote that echoes across continents, strengthening the very infrastructure that makes recycling possible.
Here’s how it works: When demand for recycled plastic products increases, recycling facilities receive a powerful economic incentive to expand their operations. Communities invest in better sorting technology. Collection programs reach more neighborhoods. Suddenly, that plastic bottle you tossed in the recycling bin has a guaranteed second life, transforming into beautiful, functional furniture rather than ending up in landfills or oceans.
This creates what economists call a “circular economy,” where materials flow in continuous loops rather than following a straight path to disposal. Your purchase supports collection workers, sorting facilities, processing plants, and manufacturers who specialize in transforming waste into value. It’s everyday sustainability in action, making environmental responsibility accessible and achievable.
The ripple extends globally too. As Western markets embrace recycled plastic furniture, developing nations gain incentive to establish their own recycling infrastructure, creating jobs while reducing pollution. Your backyard seating choice genuinely contributes to worldwide waste reduction, proving that individual decisions, multiplied across thousands of households, create meaningful environmental change.
Durability That Outlasts Traditional Materials
Weather Resistance You Can Count On
Mother Nature throws everything she’s got at outdoor furniture, and recycled plastic seating takes it all in stride. Unlike traditional materials that deteriorate over time, recycled plastic furniture genuinely thrives in challenging conditions.
Rain and snow? They simply slide right off. The non-porous surface means water can’t seep in to cause rot or swelling like it does with wood. During winter months, snow accumulation won’t leave behind the warping and cracking that plague other materials.
The intense UV rays that fade cushions and crack conventional plastics barely affect high-quality recycled plastic furniture. Advanced UV stabilizers built into the material during manufacturing protect against sun damage, keeping your seating looking vibrant year after year. Those scorching summer afternoons by the fireplace won’t compromise the color or structural integrity.
Temperature swings from freezing winters to sweltering summers present no problem either. The material expands and contracts minimally, maintaining its shape and strength through extreme conditions. There’s no rust, no splintering, and no maintenance headaches. When you’re investing in new outdoor furniture, choosing recycled plastic means choosing peace of mind alongside environmental responsibility.
Minimal Maintenance, Maximum Enjoyment
Here’s something that’ll make you smile: while your neighbors spend their weekends sanding, staining, and sealing their outdoor furniture, you’ll be relaxing by the fire with a good book. Recycled plastic seating requires virtually zero maintenance beyond an occasional rinse with the garden hose or a quick wipe-down with soap and water.
Unlike wood furniture that demands seasonal treatments and protective coatings, or metal pieces that need rust prevention care, recycled plastic simply doesn’t ask much of you. There’s no painting, no refinishing, and no worrying about leaving cushions out in unexpected rain. The color runs throughout the material, so scratches barely show, and UV stabilizers built into the manufacturing process mean your seating won’t fade or crack under harsh sun exposure.
For families who’ve chosen sustainable living, this low-maintenance quality means more time enjoying your outdoor space and less time working on it. A few minutes of simple cleaning twice a year keeps your seating looking fresh for decades, making it the perfect match for your busy, eco-conscious lifestyle.
Choosing the Right Seating for Your Space
Finding the perfect seating arrangement for your outdoor fireplace gathering spot is like putting together pieces of a puzzle – everything needs to fit just right. The good news? Recycled plastic seating comes in such amazing variety that you’ll have plenty of options to create your ideal setup.
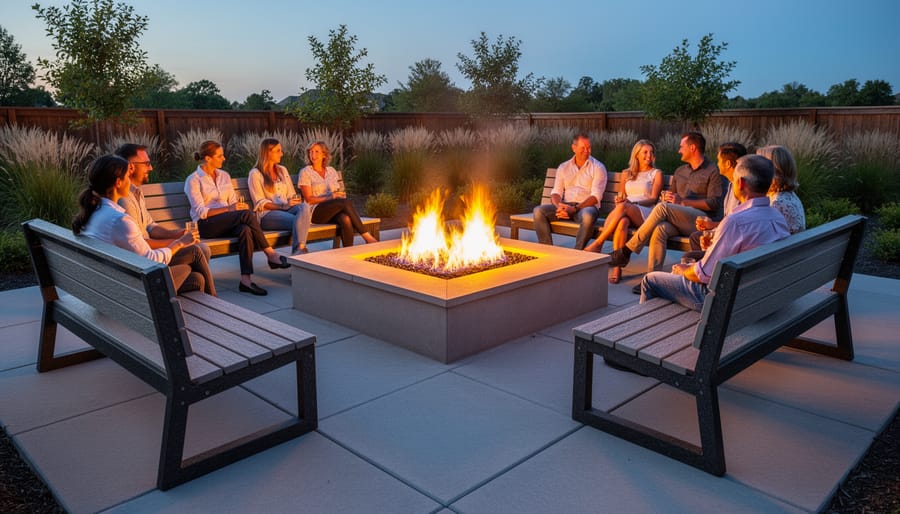
Start by measuring your space and considering your fireplace size. For smaller fire pits, two or three Adirondack chairs positioned in a cozy semicircle create an intimate conversation area. Got a larger fireplace and more room to work with? Consider a combination of benches and individual chairs that can accommodate your typical crowd while maintaining that comfortable 3-4 foot distance from the flames.
Think about how you actually use your outdoor space. Do you host large gatherings where flexibility matters? Lightweight recycled plastic chairs are easy to rearrange as your guest list grows. Prefer quiet evenings with just your family? Deeper seating with ottomans might be your perfect match. Many of our customers love mixing different seating styles – perhaps a loveseat flanked by rocking chairs – to give everyone their preferred perch.
Your personal style absolutely matters here. Recycled plastic seating now comes in colors ranging from classic neutrals that blend beautifully with natural surroundings to vibrant hues that make a statement. Some prefer the traditional look of wood-grain textures, while others embrace the sleek, modern aesthetic of smooth finishes.
Don’t forget practical considerations like storage. Many recycled plastic pieces stack easily, and since they’re weatherproof, you can leave them out year-round without worry. That convenience means more time enjoying your fireplace and less time hauling furniture in and out. Whatever you choose, you’re making a choice that’s good for both your outdoor living dreams and our planet.
Picture this: as twilight falls, your family gathers around the warmth of your outdoor fireplace, settled comfortably on beautiful seating that tells a story of second chances. Every bottle diverted from landfills, every pound of ocean-bound plastic transformed into something lasting and useful. This is where comfort meets conscience, where your outdoor sanctuary becomes a living testament to the choices that matter.
Choosing recycled plastic seating for your fireplace area isn’t just about furnishing a space. It’s about creating a legacy. When your grandchildren ask about those handsome Adirondack chairs or that inviting bench, you’ll share more than a furniture purchase story—you’ll tell them about stewardship, about businesses built on family values and environmental dedication, about making decisions that honor both the people we love and the planet we share.
The fireplace has always been humanity’s gathering place, a symbol of warmth, community, and home. By surrounding yours with sustainable seating, you’re honoring that tradition while writing a new chapter—one where beauty, durability, and environmental responsibility rise together like sparks into the night sky. Your outdoor living space is waiting. Make it extraordinary. Make it sustainable. Make it yours.